Sunday, 17 November 2013
Saturday, 25 July 2009
MY DEAR JANE JOURNEY
I started my Dear Jane Journey recently. I know it's going to be a huge challenge to me but I couldn't resist the magic and beauty of the facts that involve that quilt. So, as I am keeping a Journal about it as well, I decide that it worth to share the experience I am having building my blocks and my way to made my Jane's Babies. I haven't make any pictures of the constructions of these blocks, but I promise that I will share anything that can help anyone interested in learn about it. Humblely I present you my first days with Dear Jane.

Blocks-13 - Corners: 2 - Triangles: 0
A-1-Pinwheel Gone Awry


A-6-Uncle Homer

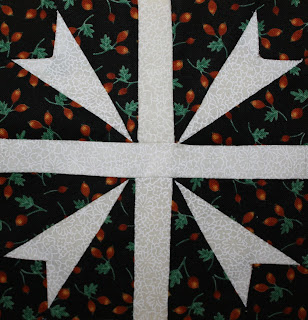
A-13-Starlight Starbright

B-1-Batchelor Buttons


C-11-Soldiers and Sailors Monument
A-5-Cathie's Campfire
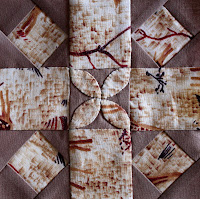
C-12-Family Reunion
B-3-Mirror Image
A-4-Courtney's Stethoscope
F-7-Stars Struck
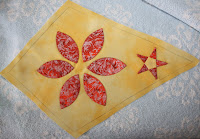
F-6-Deanie's Daises


I started my Dear Jane Journey recently. I know it's going to be a huge challenge to me but I couldn't resist the magic and beauty of the facts that involve that quilt. So, as I am keeping a Journal about it as well, I decide that it worth to share the experience I am having building my blocks and my way to made my Jane's Babies. I haven't make any pictures of the constructions of these blocks, but I promise that I will share anything that can help anyone interested in learn about it. Humblely I present you my first days with Dear Jane.

Blocks-13 - Corners: 2 - Triangles: 0
A-1-Pinwheel Gone Awry


A-6-Uncle Homer

A-13-Starlight Starbright

B-1-Batchelor Buttons


C-11-Soldiers and Sailors Monument
A-5-Cathie's Campfire
C-12-Family Reunion
B-3-Mirror Image
A-4-Courtney's Stethoscope
F-7-Stars Struck
F-6-Deanie's Daises
D-13-Field of Dream
Bottom Right Corner


Friday, 10 July 2009
Fiz esse passo a passo muito rapido ontem. Nao ficou muito bom pq nao tenho muita experiencia ainda com o programa, mas prometo que os proximos serao melhores. Qualquer palavra errada que aparece la, por favor me perdoem. Espero que possa ajudar aqueles (as) que estao iniciando. Vou fazer novos videos de outras tecnicas pra ajudar quem ainda tem dificuldades. Essa e a meta desse blog, "compartilhar o que sei e aprender o que nao sei ainda"
Aproveitem!!!
Wednesday, 24 June 2009
People have asked me about the Dresden technique. This is a tutorial of my way to make it. There is another easier way that I use but it needs a guide when you are sewing, to make sure all the seam allowance will be exactly the same. Any question, just ask.
This is not a tutorial for experts, it is for begginers.
How to make your template.
How to make your template.
- With a compass, draw a circle, calculating the size of your plate.
- Draw another circle within the first, calculating the size of the centre of your plate.
- Divide the big circle in 4 parts.
- Take the measure of the section of the circumference from A to B.
- Divide it for 3 (in case you want to make a plate with 12 parts).
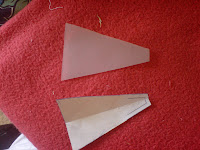
- Draw a line from A1 to the centre of the circle and another A-A1. That is your Dresden. (see the picture)
- As you can see, you lose a bit of the size of the template when you draw the line A to A1. So, considere it when plan your Plate.
A pedidos, to postando este passo a passo. Esta e a forma que sei fazer mas existem outras mais rapidas. Qualquer pergunta, deixe recado e respondo.
Como desenhar o seu molde:
- Usando um compasso, desenhe um circulo do tamanho do Dresden que vc quer.
- Desenhe outro circulo dentro do primeiro, do tamanho que vc quer que fique o centro.Divida em 4 partes iguais
- Faca a medida do ponto A ao Ponto B
- Divida o valor da medida AB em 3 partes iguais e trace uma reta do ponto A ao ponto C (no centro).
- Trace outra reta do ponto A ate A1. O retangulo A-A1-C e o seu molde do Dresden Plate.
- Como reparou, o espaco que sobra entre a reta A-A1 e o arco formado vai deixar o seu molde ligeiramente menor que o tamanho de seu circulo, portanto qdo planejar o seu Boco final, considere essa perda.

Making it
- Choose your fabrics.
- Use the colour wheel to help you.
- Put the fabrics right side down.
- Draw the template making sure the line is visible and leave ¼” seam allowance.
- Cut them all, fold the right side together and iron them.
- Go to the sewing machine and sew them all.
- Open the seam. Turn them to the right side and place the seam exactly on the mark of the fold. (see pictures).
- Sew them together forming the design you want.
FAZENDO
Escolha seus tecidos de sua preferencia – 3 cores para 12 petalas.
Use o circulo de cores pra te ajudar a dar mais coerencia na escolha das cores predominantes de seus tecidos.
Escolha seus tecidos de sua preferencia – 3 cores para 12 petalas.
Use o circulo de cores pra te ajudar a dar mais coerencia na escolha das cores predominantes de seus tecidos.
Colour Wheel
Disco de Cores

Tecidos escolhidos, risque um por um. Use a mesmo sentido da trama para todos os tecidos. Recorte deixando ½ cm para costura.
Depois que recortar todos, dobre ao meio, no sentido de comprido colocando direito com direito. Passe todos a ferro.

 Costure em cima da linha.
 Abra a costura. Assim.
Vire pra o direito. Acerte a ponta com uma caneta sem tinta. E melhor que a ponta da tesoura


Costure lado a lado de acordo com o seu desenho. Abra as costuras. Passe a ferro.
 Pronto
Use a sua imaginacao e crie seu Dresden como quiser. Por exemplo. Faca um molde em papel vegetal,
Use your imagination and create your Dresden Plate. Example: Cut the template in a transparent paper or plastic and create a kaleidoscope, using prints of your fabrics.
e crie um caleidoscopio com as imagens que quiser.
O seu dresden pode ser usado como desejar. Ele e super versatil.
 Divirta-se!!!! Have Fun!!!

e crie um caleidoscopio com as imagens que quiser.
O seu dresden pode ser usado como desejar. Ele e super versatil.
 Divirta-se!!!! Have Fun!!!
Veja alguns exemplos.
These are some examples.


(Para qdo voce nao usar papel colante (fusible) e for aplicar o centro a mao)
Com a medida do circulo que vc quer, faca o molde em papelao ou outro material de sua preferencia. Corte no tecido deixando um cm para costura. Faca o franzido do circulo como se fosse fazer um fuxico. Deixe o molde papelao dentro. Aplique o circulo somente quando ja estiver com o seu Dresden aplicado no seu quilt. Aplique com o molde dentro. Faca um corte do lado avesso e retire o molde.
THE CENTRE
(For applique by hand and if you don't have any fusible)
- Cut your centre in a carton (material hard and flexible),
- Cut the fabric leaving 1/4" of seam,
- By hand sew the boad of your fabric circle like the way you do to make a Yo-Yo. Keep the template inside.
- The centre will be the last part of the Dresden that you will make the applique. Applique it with the template inside. Make a small cut of the wrong side of your quilt and pull the template out.
Subscribe to:
Posts (Atom)